
Help ›
Help for the dispatcher
Every user has this help inside the application too — under Help in the menu, always for their own role.
Help for dispatchers
This help takes you step by step through everything you will do in the application. Each step comes with a picture of what the screen looks like. Read it through, or go straight to whatever you are dealing with right now.
Finding your way around
At the top there is a blue bar with the menu (Overview, Map, Chat, History, Customers, Calls, Vehicles, Reports). Click to switch between screens. At the top right there is your name and the Log out button.
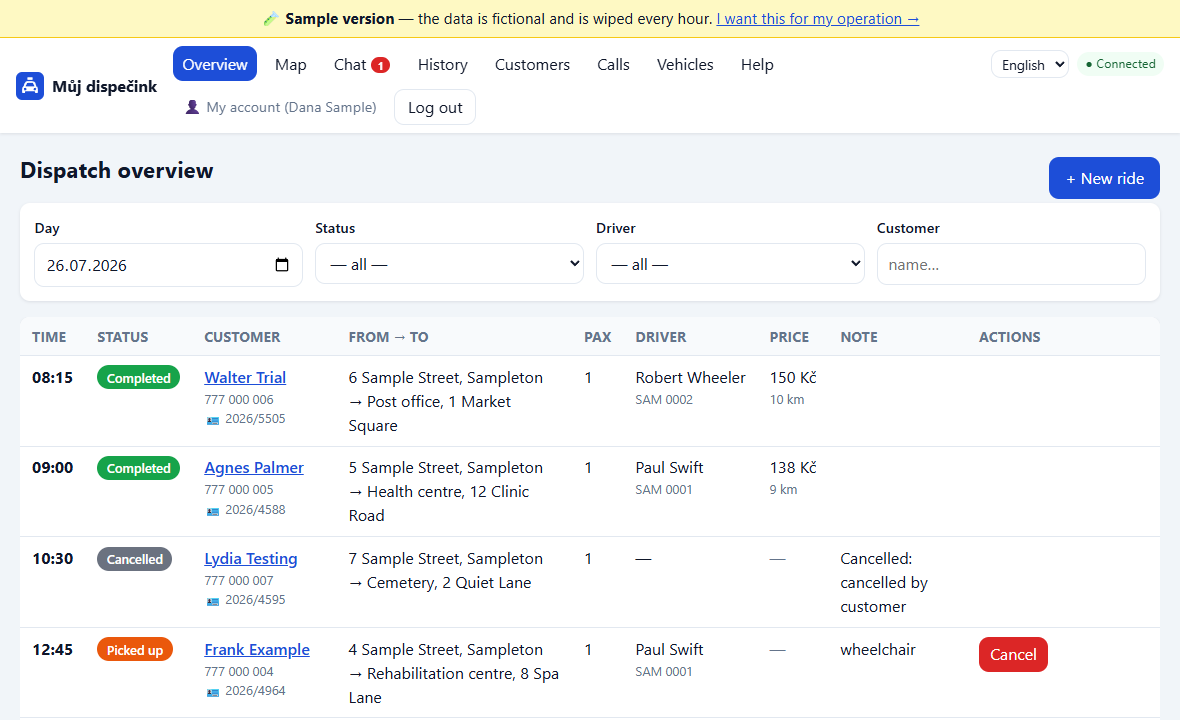
The main screen is the Dispatch overview: a list of today's rides. For each ride you see the time, a coloured status label, the customer, the route, the driver and the action buttons on the right.
💡 Coloured status labels: blue New, yellow Assigned, purple Confirmed, orange Picked up, green Completed, grey Cancelled.
How to sign in
- Open your web browser (Chrome or Edge, for example).
- Type the address of the application in the bar at the top and press Enter.
- You will see the sign-in screen with Viacurso on it.
- Type your username in the first box.
- Type your password in the second box.
- Click the blue Sign in button.
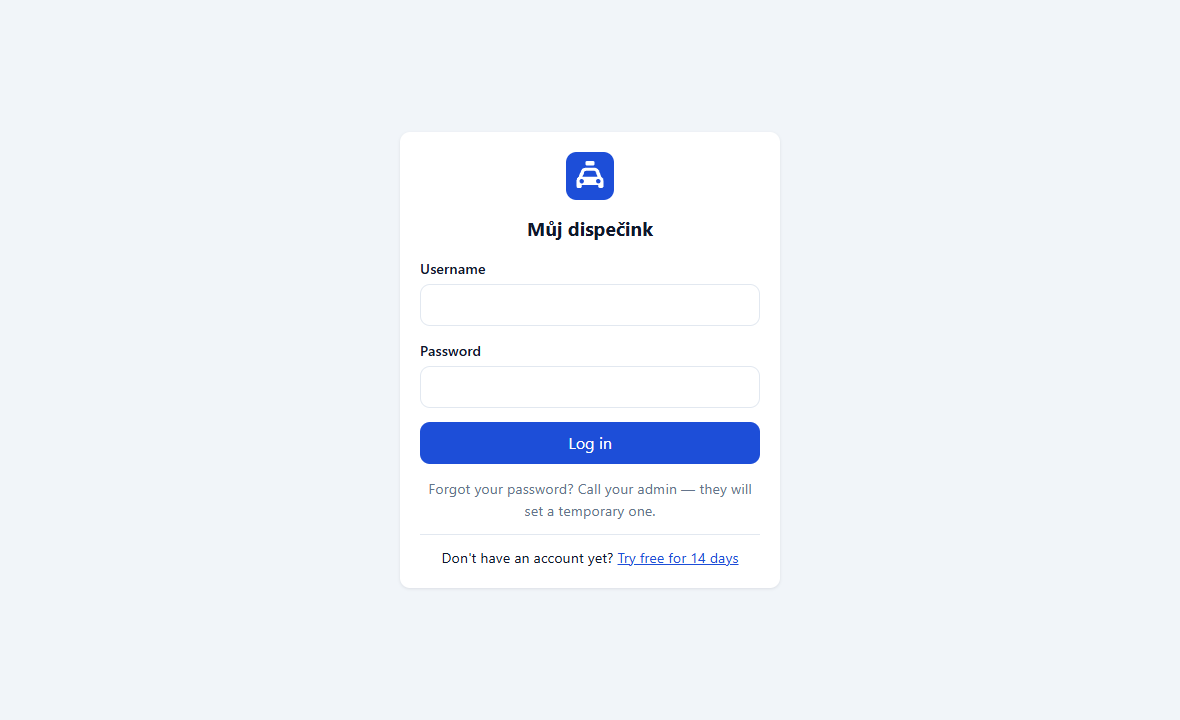
👀 What you will see: the main Dispatch overview screen with today's rides.
⚠️ If something goes wrong: if a red box saying "Incorrect username or password" appears, check the Caps Lock key (capital letters) and try again. If it still does not work, call your administrator.
How to add a new customer
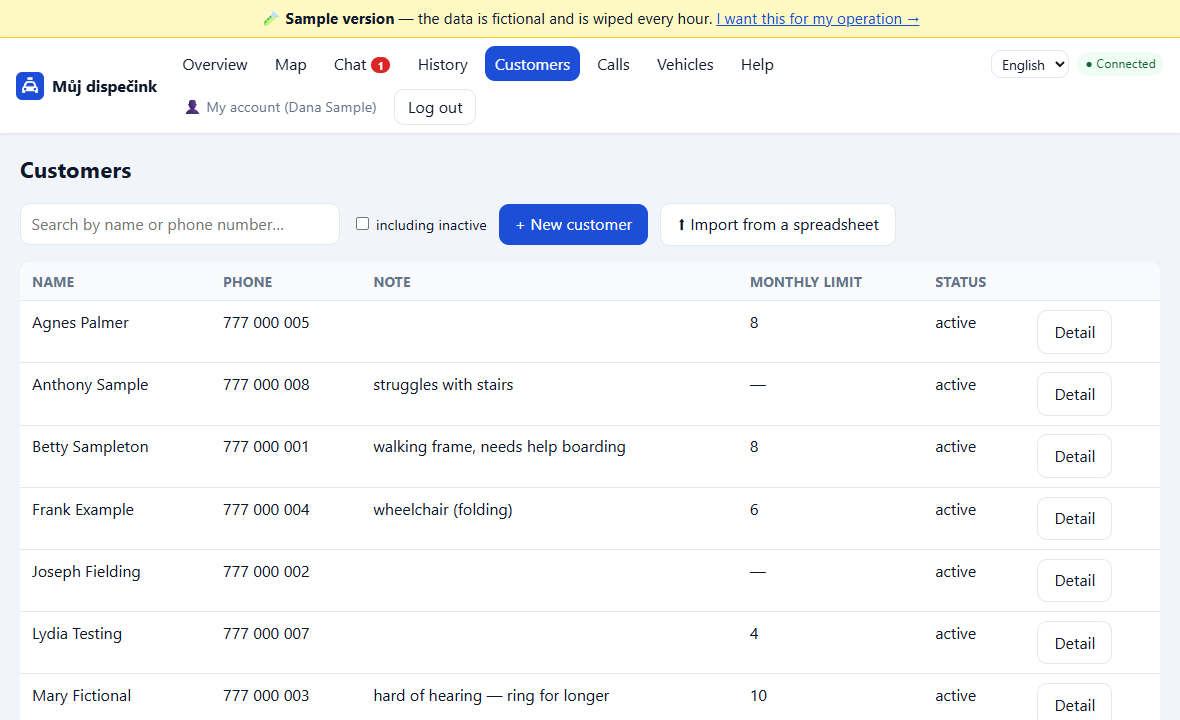
- Click Customers at the top.
- Click the blue + New customer button.
- Fill in the name (required) and the phone number.
- In the note write anything worth knowing — such as "walking frame, needs help boarding".
- If the customer has a client pass (with contracted senior transport for a municipality, for example), write its number in the Pass number box — you will then see it on the ride in the overview (🪪 under the name), the driver sees it at pickup and it carries over to every ride in the report. If you get the number wrong, the driver can correct it at pickup — the change is recorded in Activity.
- If the customer has a limited number of rides per month, write the number in the Monthly ride limit box. Otherwise leave it empty.
- Click Save.
👀 What you will see: the customer's card opens.
How to upload many customers at once (spreadsheet import)
Do you have a list of customers on your computer (from the municipal records, for example)? You do not have to retype them one by one:
- Click Customers at the top and then **⬆ Import from a spreadsheet**.
- Click Download the template (Excel) — a file with instructions and a prepared sheet is saved to your computer.
- Open it in Excel and fill it in — one row = one customer. Only the name is required; phone, home address, note and monthly ride limit are optional. Delete the sample row.
- Upload the saved file back in the import window.
- The application shows a preview: how many customers are fine and which rows have a problem (the same phone number twice, for example) — nothing is saved yet.
- Click Import … customers. Rows with a problem are skipped — you can correct them in the file and upload it again; the rest will not be duplicated (the phone number is checked).
👀 What you will see: the new customers appear in the list, and the address from the template will be on their card as "Home".
How to add a favourite address to a customer
- On the customer's card find the Favourite addresses box.
- In the first box write a name — "Home" or "Health centre", for example.
- In the second box write the full address — "12 Short Street, Town", for example.
- In the drop-down choose where the address should be offered:
- Pick-up and drop-off — right for a home address, people travel from there and back. This is the default and never hurts.
- Pick-up only — a place people set off from.
- Drop-off only — a destination. Typically a health centre, pharmacy or cemetery.
- Click Add.
💡 Good to know: these addresses can then be picked with a single click when creating a ride — you do not have to type them again. The direction only decides which drop-down the address appears in; a shorter list means less searching. Addresses saved before this existed are set to Pick-up and drop-off — you can switch them any time with the drop-down next to the address, it saves immediately.
How to create a ride
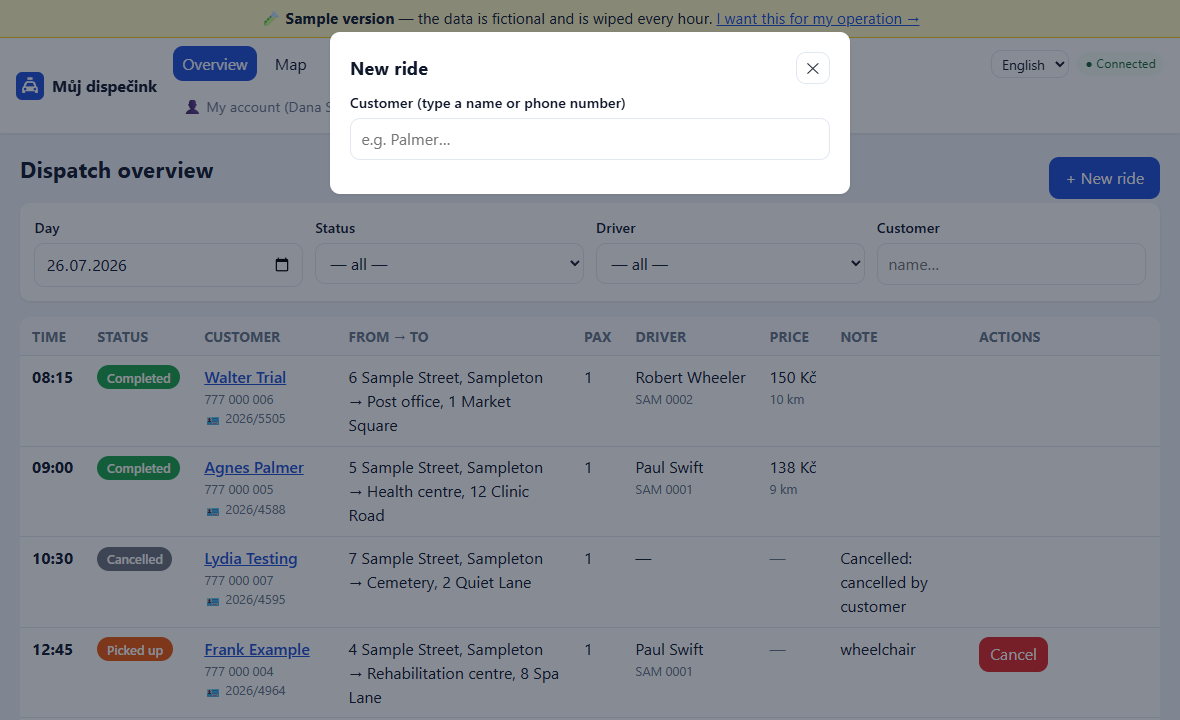
- On the main screen click the blue + New ride button.
- Start typing the customer's name or phone number. A list appears below the box — click the right customer. Not in the list? You will be offered + New customer: … and they are created along with the ride (see "When somebody calls who is not in your customer list").
- In the From box pick one of the saved addresses, or choose Enter manually… and type the address. While typing, the app offers addresses this customer has set off from before — one click and you avoid retyping.
- Fill in the To box the same way. Here it offers places they have travelled to.
- Check the date and fill in the pickup time.
- Fill in the number of passengers and a note if needed.
- Price per km is pre-filled with the region rate — if you leave the box empty, the region rate is used. Only overwrite it when this ride should have a different rate.
- Click Create ride.
💡 Who enters the distance: the driver fills in the distance when finishing the ride (from their navigation) — the price is then calculated from it. You do not have to enter the distance.
👀 What you will see: the ride appears in the overview with a blue New label.
⚠️ If something goes wrong: if a warning about exceeding the monthly limit appears, the ride has been created anyway — you just know about it and can decide whether to cancel it.
How to book the way back (return trip)
The hairdresser, the doctor, the council office — nearly every ride has a journey home as well. You do not have to enter it from scratch:
- In the overview click the customer's name — the ride detail opens.
- Click ↩ Return trip.
- A new ride form opens with everything already filled in:
- the addresses swapped (where they went, they now travel back from),
- the customer and the number of passengers,
- a time two hours later as a suggestion.
- Adjust the time to whenever the appointment ends and click **Create ride**.
💡 Why two hours: it is only an estimate so the field is not empty — that is roughly how long an appointment takes. Always overwrite it with what the customer tells you. If the return would fall on the next day, the time is left empty on purpose so that you do not miss it.
👀 What you will see: a new ride in the overview, exactly like any other — assign it to a driver in the usual way.
When somebody calls who is not in your customer list
There is no need to leave the ride form and create the contact separately.
- In New ride, type the name or the phone number into the customer field.
- Below the suggestions you will be offered + New customer: … — click that.
- Fill in the addresses and the time, and save the ride.
The customer is created together with the ride. The rest — home address, notes, pass number, monthly limit — you fill in whenever you like, once the rush is over.
👀 What gets saved: if you type only a phone number, the customer is named after it (
605 123 456) — easy to find in the list and rename later.
💡 An unknown number calling? The call box now has a New ride button — it opens the form with the number already filled in.
🛟 If the number is already on file, the ride is attached to the existing customer. One person does not end up as two records, even if you type them in again in a hurry.
How to assign a ride to a driver
- Find the ride in the overview and click the Assign button.
- A list of drivers opens. For each one you can see how many rides they currently have.
- Click Assign next to the chosen driver.
👀 What you will see: the ride's label changes to yellow Assigned. Once the driver accepts the ride on their phone, the label changes to purple Confirmed.
You can hand the ride to another driver the same way (the Reassign button).
⚠️ When a driver declines a ride: the ride returns to the overview with a blue New label and you assign it to somebody else. You will find the reason for declining in the ride detail (click the customer's name).
How to attach a car to a ride (and what the seat check does)
- When you assign a driver to a ride (the Assign or Reassign button), the box also has a Vehicle field.
- Pick a car from the list, or leave "— no vehicle —". A car is not required — the ride works without one.
Each vehicle in the list shows its number of passenger seats, so you do not have to look it up on another screen.
👀 What you will see: the car's registration appears in the overview under the driver's name, and the driver sees it on their ride.
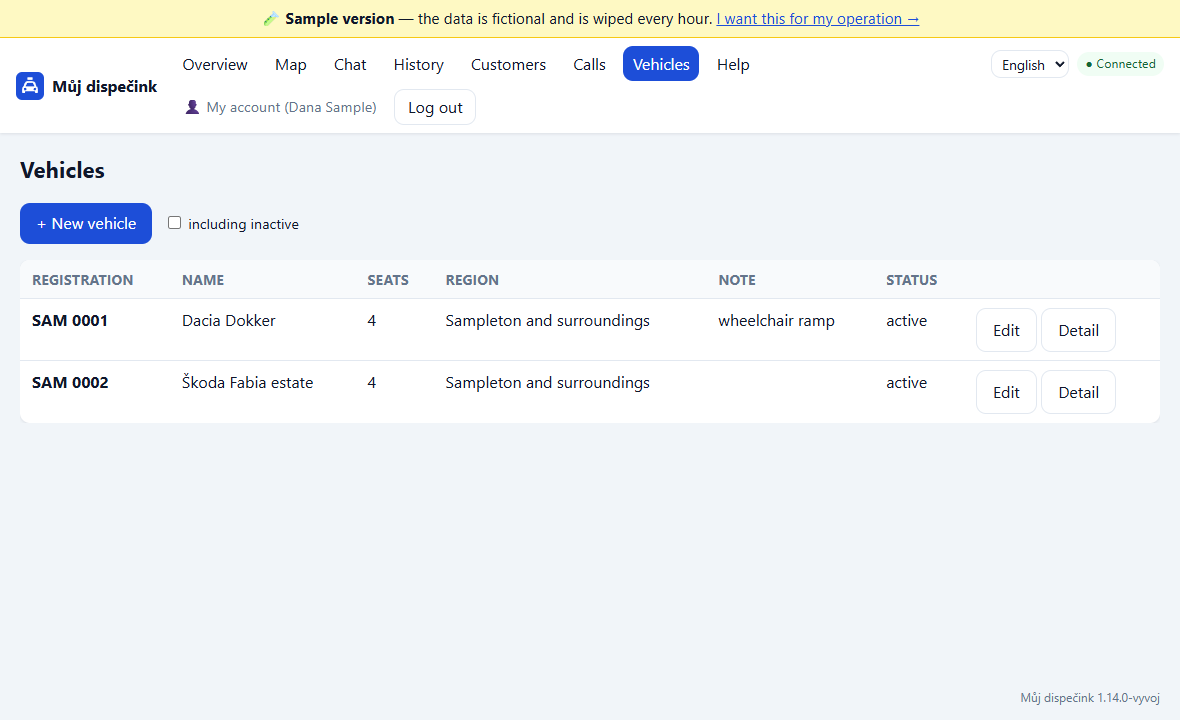
Cars are managed under Vehicles (adding a new one, taking a broken one out of service — the Edit button and unticking "active").
If the chosen car has fewer seats than the ride has passengers, a red warning appears — and once more at the top of the overview after you assign it.
💡 The warning does not block anything. You can still assign the ride: you may know something the application does not — that a second car is following, or that the seat count on the vehicle is wrong. The point is only that nobody finds out at the kerb that the group does not fit.
👀 Where the seat count is set: on the vehicle (Vehicles → vehicle → number of seats). The administrator sets it, and it means seats for passengers, not counting the driver.
How to print a driver's daily plan
Not every car has a signal and not every driver wants to stare at a phone. The daily plan is a single sheet of paper with all the rides of one driver for one day.
- At the top of the overview set the Day and the Driver.
- Click 🖨 Driver's daily plan. A PDF downloads, ready to print.
👀 What is on the paper: the time and the customer's name in large type, from and to, phone number, pass number, number of passengers and the car registration, the note about the customer and about the ride. Every ride has a tick box and an Distance km: ______ line for the driver to write the kilometres in pencil.
💡 Tip: print in the morning, once the day is settled — the plan is a snapshot of the moment it was printed, it does not refresh itself. If something changes later, ring the driver; paper is a backup, not the source of truth.
Cancelled rides are left off the paper. A ride without a driver is not in anybody's plan — assign it first.
How to cancel a ride
- In the overview click the red Cancel button next to the ride.
- You may write the reason for cancelling. It is optional — if you are in a hurry, leave the field empty.
- Click Cancel ride.
👀 What you will see: the ride gets a grey Cancelled label and the reason is saved.
💡 Tip: reasons are added up in Statistics, so even a short note ("customer did not show up") will show you where the problem is over time. Rides without a note are counted there as "no reason given".
What "Connected" at the top means
At the top right you can see a small label:
- Green ● Connected — everything is fine. New rides and changes appear on the screen by themselves, you do not have to click anything.
- Orange ● Offline — reconnecting… — the connection dropped for a moment. Do nothing; the application reconnects and refreshes the data by itself. In the meantime the overview refreshes more slowly (roughly every 15 seconds).
Live driver map
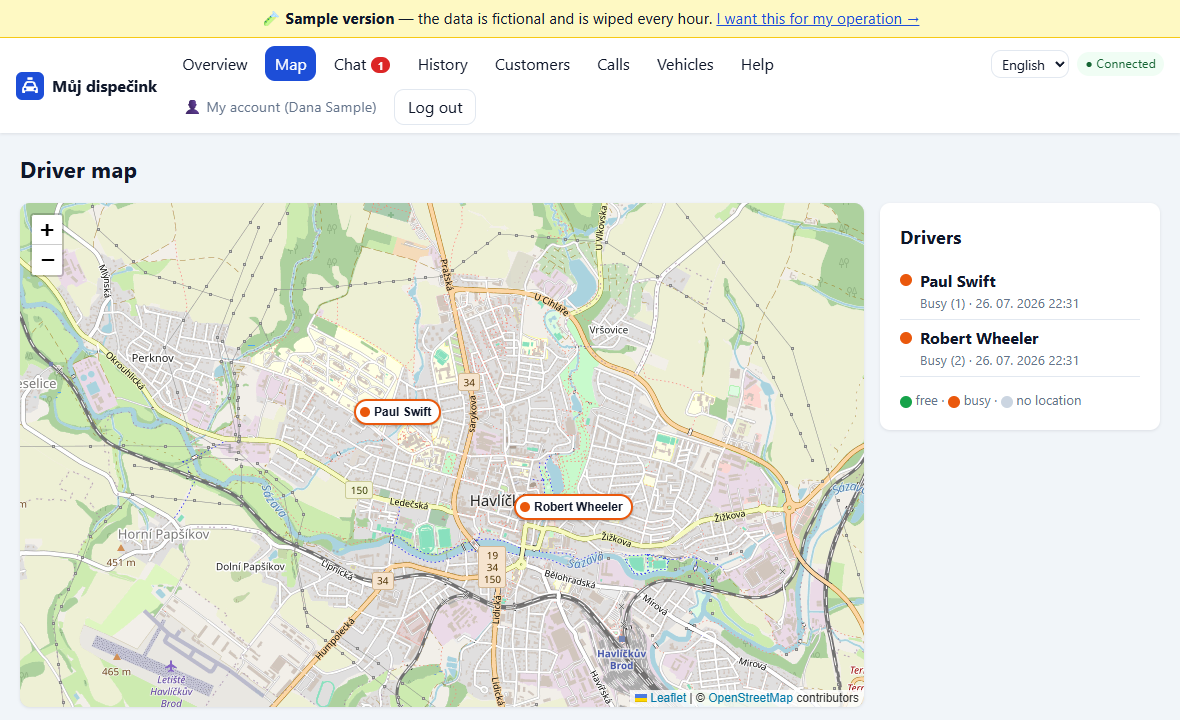
- Click Map at the top.
- On the map you can see markers for drivers who have location sharing turned on.
What the marker colours mean:
- green — the driver is free (has no ride),
- orange — the driver is busy (has a ride in progress).
- Click a driver's marker to see their name, the time of their last location and a list of their rides in progress.
- The list on the right shows all drivers. Anyone marked "Not sharing location" or "Location is not available" is not on the map — perhaps they do not have sharing turned on, or they have no signal. That is normal, nothing is wrong.
📌 Careful: the map is only an extra. Always handle rides in the Overview — everything is there, including drivers without a location.
How to message a driver (Chat)
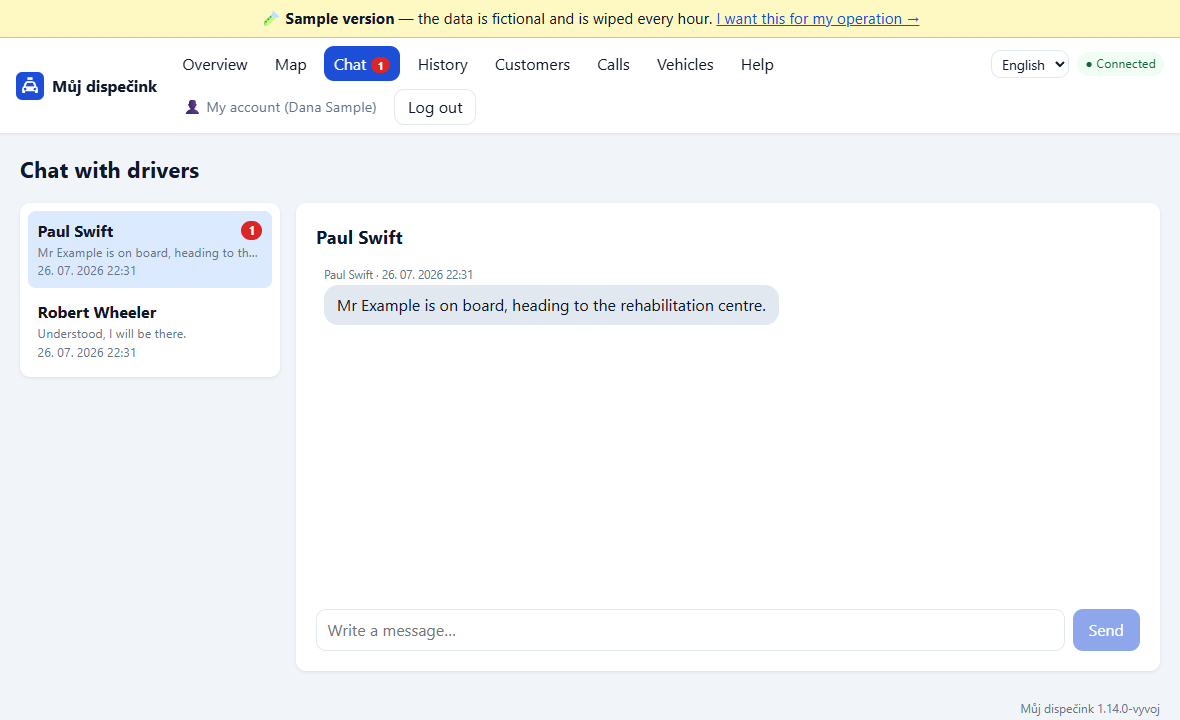
- Click Chat at the top. When a red number is showing next to it, that is how many unread messages you have.
- Choose a driver on the left. Anyone with unread messages is at the top with a red number.
- Write your message at the bottom and click Send.
👀 What you will see: your messages are blue on the right, the driver's messages grey on the left. New messages appear by themselves, you do not have to refresh anything.
💡 Good to know: all dispatchers see the conversation with a driver — when a colleague on shift replies, you see it too. Drivers cannot message each other.
When somebody calls (the caller box)
When the phone connection is switched on (the administrator switches it on), this is what happens when somebody calls:
- A green box with a phone appears at the bottom right of the screen.
- When a known customer calls, you see their name, note ("walking frame", for example), **how many rides they have already had this month and their recent rides**.
- Click the green 🚕 New ride button — a form opens with the customer and their home address already filled in. You just add where to and at what time, and click Create ride. You can manage it while still on the call.
💡 When an unknown number calls: the box has two buttons. New ride opens the ride form with the phone number already filled in — the customer is created along with the ride and you add the name later. Use Create a new customer when you only want to save the contact and not book a ride yet.
💡 When several names appear: two customers share the same number (a married couple, for example). Ask who is calling and click the right name.
How to close the box: with the cross at the top right. Nothing is lost — the call stays in the Calls list, where you can find it later.
📌 The box never throws away work in progress — when you have a half-filled form open, the box simply waits beside it.
Where to find the list of calls
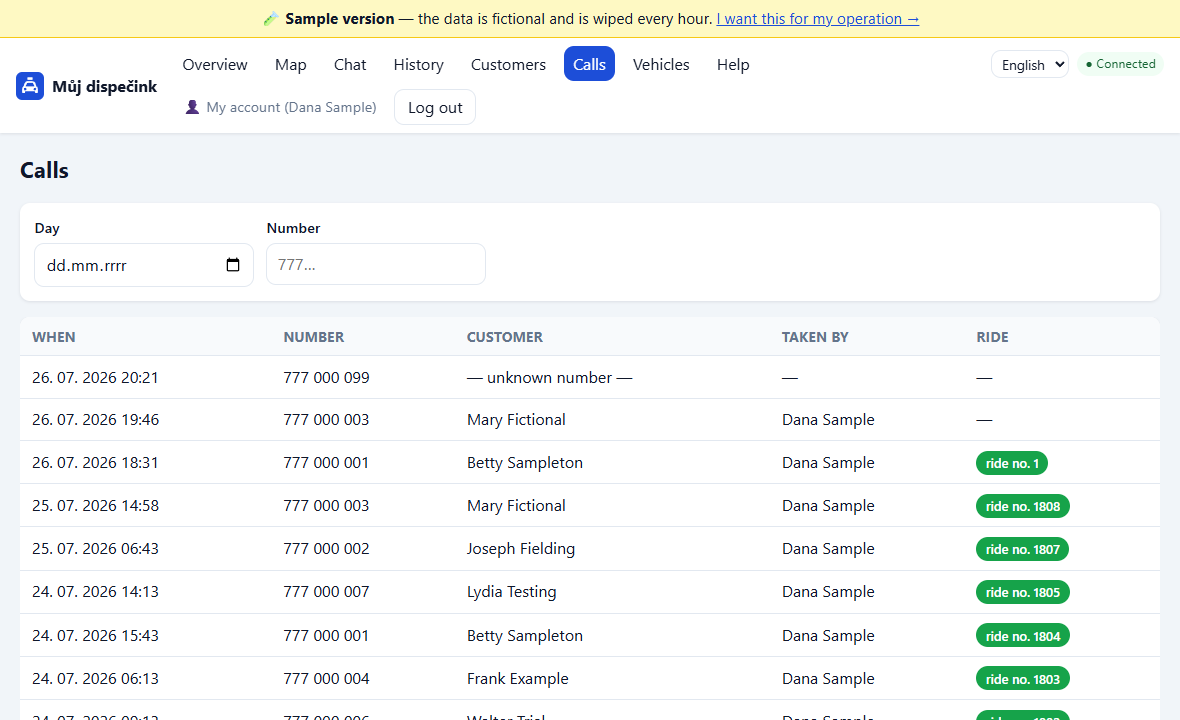
- Click Calls at the top.
- You can see who called and when, whether it was a known customer, who took the call and whether it turned into a ride.
- You can filter by day or type part of a number.
💡 Good to know: calls are cleared automatically after a while (usually after three months) — it is only a working record, nothing is recorded.
Where to see the ride price and how to change it
The price is shown in the Price column in the overview and in the ride detail (click the customer's name). It is calculated from the distance travelled (entered by the driver when finishing) and the rate per km.
- "120 Kč" — a price calculated from the pickup fee and the distance travelled.
- "40 Kč (estimate)" — the ride has no distance recorded (the driver did not enter it), so this is only the pickup fee. The real price was higher.
- "—" — there is no price: the region had no prices set on the day of the ride.
Changing the distance and price: in the ride detail (click the customer's name) there is a box with Distance and Rate/km. You can correct the distance travelled (when the driver forgot to enter it, for example) and the rate per km for this ride, and click Save and recalculate the price. An empty rate = the region rate is used.
💡 Good to know: the basic rate per km and the pickup fee are set by the administrator under Regions → Price list. The rate on a ride only overrides it for that one ride.
📄 Downloadable monthly reports are made by the company administrator — you will find them in their help. You have History (below) at hand, with all completed rides and their prices.
How to find older rides
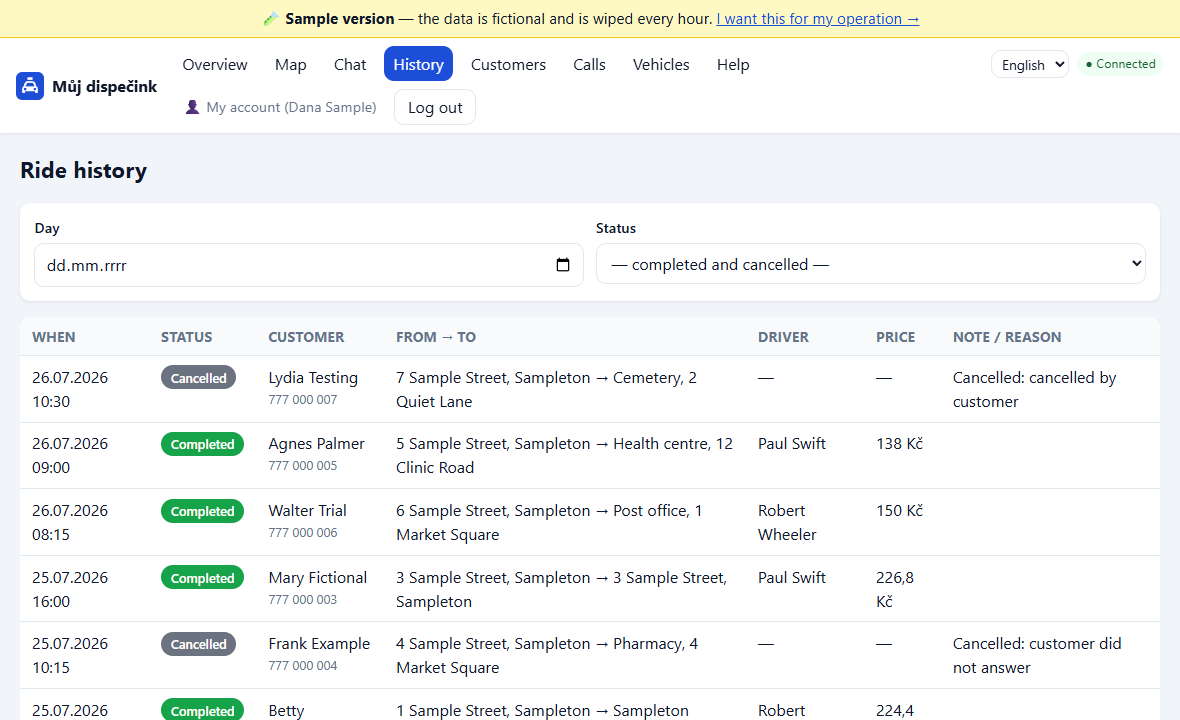
- Click History at the top.
- You can see all completed and cancelled rides, the newest at the top.
- You can filter by day and status; move between pages with the Previous and Next buttons.
How to change your password
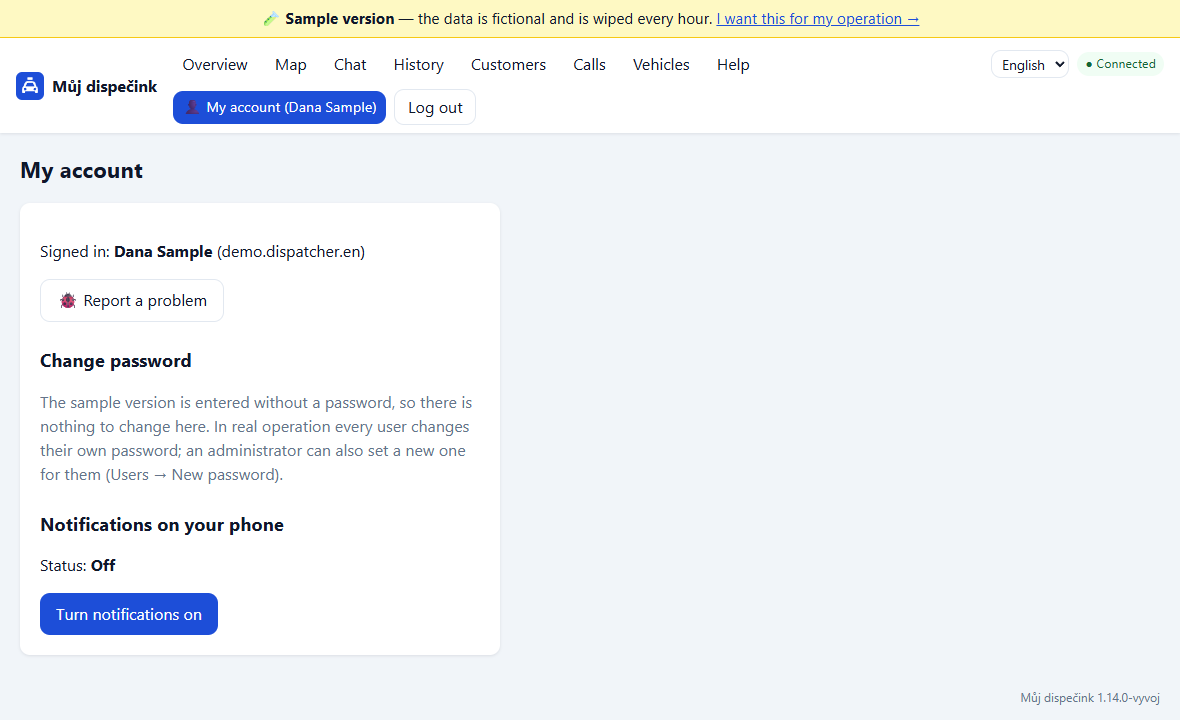
- Click your name at the top right.
- Type your current password, then the new password twice (at least 8 characters).
- Click Change password.
How to sign out
- Click the Log out button at the top right.
I have forgotten my password
Do not worry, nothing is lost. Call your administrator — they will read out a temporary password to you. Sign in with it and the application will immediately ask you to choose your own new password (type it twice). The detailed procedure is in the frequently asked questions below.