
Help ›
Help for the company administrator
Every user has this help inside the application too — under Help in the menu, always for their own role.
Help for company administrators
You are the administrator of your company in Viacurso. You can do everything a dispatcher can (rides, customers, map…) and on top of that you manage your company: people, price list, vehicles. The dispatcher procedures are in the help below.
How to set up a company (registration)
- At www.viacurso.com click Create a free account.
- Fill in the company name, your name, your email and choose a password.
- A confirmation link arrives in your email — click it.
- Sign in with your email and password.
💡 Nothing to pay: the whole application is free, you never enter a payment card and the account does not expire. More in What it costs below.
First-setup guide
After your first sign-in a guide is waiting at the top of the overview — a list of steps (region, price list, vehicles, people). Completed steps get a tick. You can skip it and start it again at any time: My account → Run the guide again.
How to invite a dispatcher or driver by email
- Click Users at the top.
- Click ✉ Invite by email.
- Fill in the name and email and choose a role.
- Click Send invitation.
👀 What you will see: the invitation appears in the "Pending invitations" list. The invited person gets an email with a link (valid for 7 days), sets a password and is signed in straight away. You can cancel or resend the invitation at any time.
How to create a driver without an email address
Drivers often have no email — for that there is a second, equally quick way:
- Click Users → 🔑 Create with a temporary password at the top.
- Fill in the name and the username (for example
karel.novak). - Click Create.
👀 What you will see: the temporary password is shown ONCE on the screen — read it out to the driver in person or over the phone (it is valid for 24 hours). On first sign-in the driver chooses their own password.
💡 Good to know: usernames apply across the whole service — if
karel.novakis taken, the application will tell you; trykarel.novak2, for example.
How to delete customers uploaded by mistake
It happens easily — instead of the client list, the whole phone book from a mobile gets imported. You can clear it up without calling support.
On the Customers screen there is a 🗑 Delete customers with no rides button at the top right (only the administrator sees it).
- Click it — the application first counts how many people the deletion would affect. Nothing is deleted yet.
- If the number looks right, confirm with Yes, delete.
👀 What gets deleted: customers who have never travelled with you, together with their favourite addresses.
🛟 What is never deleted: anybody who has already travelled. Their rides belong in the monthly report for the council. If you do not want them in the list, open their Detail and untick "active" — they disappear from the picker and the history stays.
💡 Tip: before deleting, download a copy of your data (My account → Your data). Deletion cannot be undone.
How to set up the price list
- Click Regions at the top (a region = the area you serve; one is enough for most companies).
- Next to the region click Price list and fill in the pickup fee and the price per km.
There is more detail in the administrator help below (How to set prices).
What it costs
Nothing. The whole application is free — every feature, unlimited dispatchers, drivers, vehicles and rides. You enter no payment card, no invoices or reminders arrive and the account never expires.
💡 If that ever has to change, you will hear about it at least 60 days in advance and it will never apply retrospectively — not even to data you already have in the application. You can download a copy of your database and your reports at any time (My account → Download data).
Support access
When you are sorting out a problem with us, you can temporarily allow the service provider into your account: My account → Support access → Allow for 24 hours. You will see every support entry in Activity — nothing happens behind your back. You can revoke the access at any time.
I have forgotten my password
On the sign-in page click Forgotten password? and enter your email — a link to set a new password will arrive.
Help for administrators
As an administrator you can do everything a dispatcher can (rides, customers, map, chat — see the dispatcher help below, with pictures) and on top of that you manage users, regions, prices, vehicles and monthly reports. This section covers only the extra things an administrator does.
How to add a region
A region is the area you serve (a town or a district, for example). One is enough for most services — only add more when you really do operate in several areas with different prices.
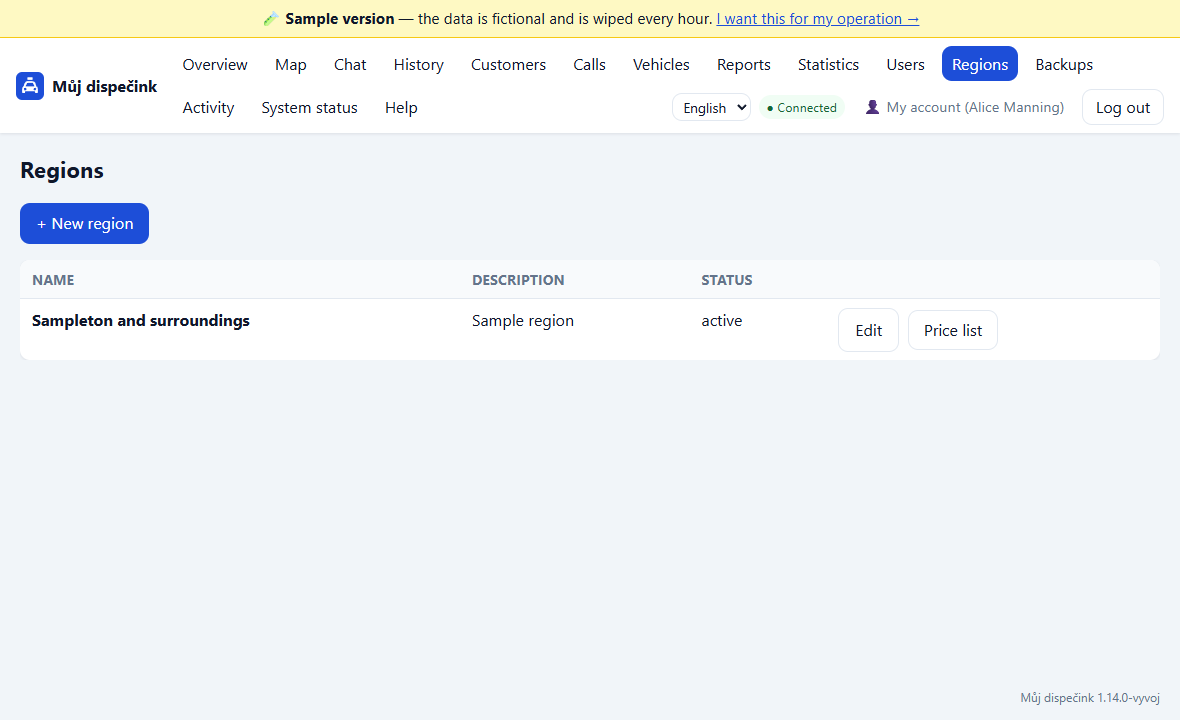
- Click Regions at the top.
- Click + New region.
- Write the name ("Brno-venkov", for example) and click Save.
👀 What you will see: the region appears in the list. New customers can then be placed in the right region.
How to set prices (price list)
- Click Regions at the top.
- Next to the region click Price list.
- In the New price list box at the bottom fill in:
- Valid from — the day from which the prices apply,
- Pickup fee — what every ride costs just for the car turning up,
- Rate per km — what every kilometre travelled costs,
- Minimum price — a ride never falls below this amount (optional),
- Weekend rates — different prices for Saturday and Sunday (optional).
- Click Save price list.
👀 What you will see: a new row in the price list history. The one currently in force has a green valid label.
Minimum billed kilometres (a municipal contract, for example)
Some contracts say: "every ride shorter than 2 km counts as 2 km". You can switch this rule on per region (each region can have its own, or none):
- Click Regions at the top and then Edit next to the region.
- In the Minimum billed km box write
2, for example. - Save.
The driver still enters the actual distance travelled — on a shorter ride only the price is calculated as if it were 2 km. An empty box = no minimum.
How to change prices (and why old rides do not change)
Prices are never overwritten — you simply add a new price list with the date from which it applies (the procedure above). Old rides keep the price from the price list that was in force on the day of the ride.
📌 Nothing to be afraid of: changing the price list never changes the prices of rides that are already completed.
Made a mistake in the new price list? Add another price list with the correct numbers, valid from today. Only a price list that has not come into force yet can be deleted.
💡 Good to know: until a region has a price list, no price is calculated for its rides (there is a "—" there). That does not matter, the prices are simply not recorded.
How to add a vehicle (car)
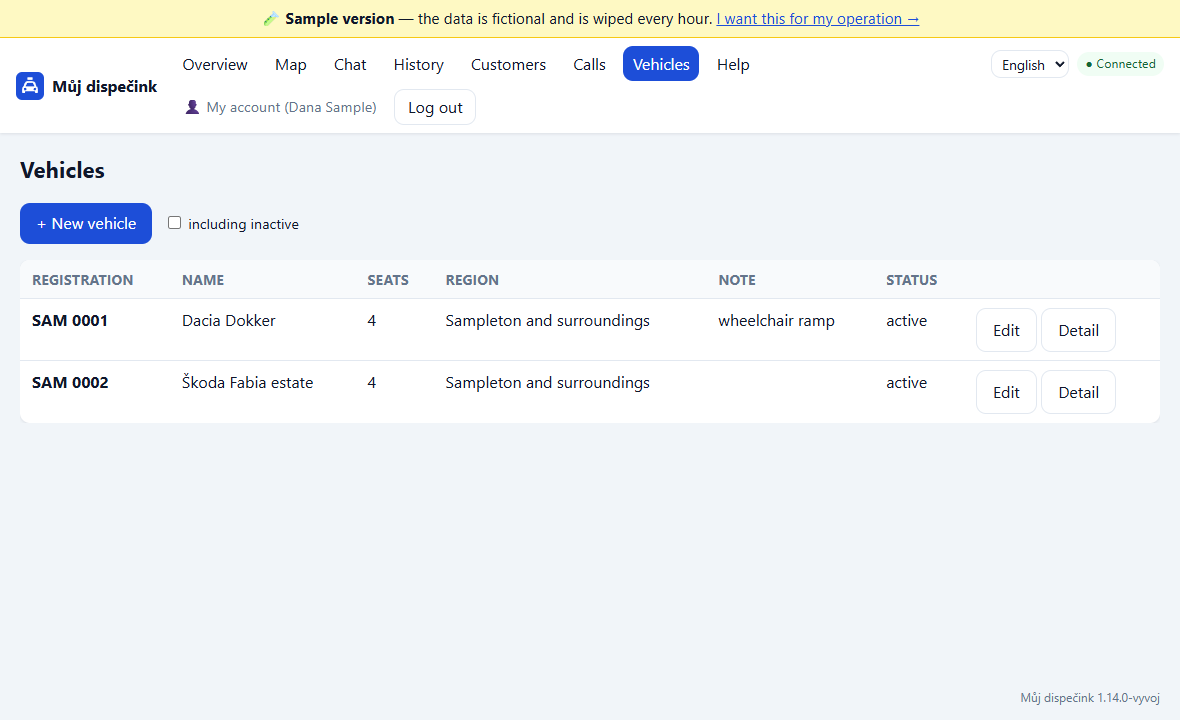
- Click Vehicles at the top.
- Click + New vehicle.
- Fill in the registration, the name ("Dacia Dokker", for example), the number of seats and a note if needed ("wheelchair ramp", for example).
- Click Save.
👀 What you will see: the car appears in the list and the dispatcher can pick it for rides. When you take a car out of service (the Edit button → untick "active"), it stops being offered, but the history of its rides remains.
💡 The number of seats means seats for passengers (not counting the driver). The application uses it to warn the dispatcher when a car is attached to a ride the passengers will not fit into — it does not block anything, it only warns.
Somebody has forgotten their password — how to set a new one
This is what you will do most often. It takes half a minute:
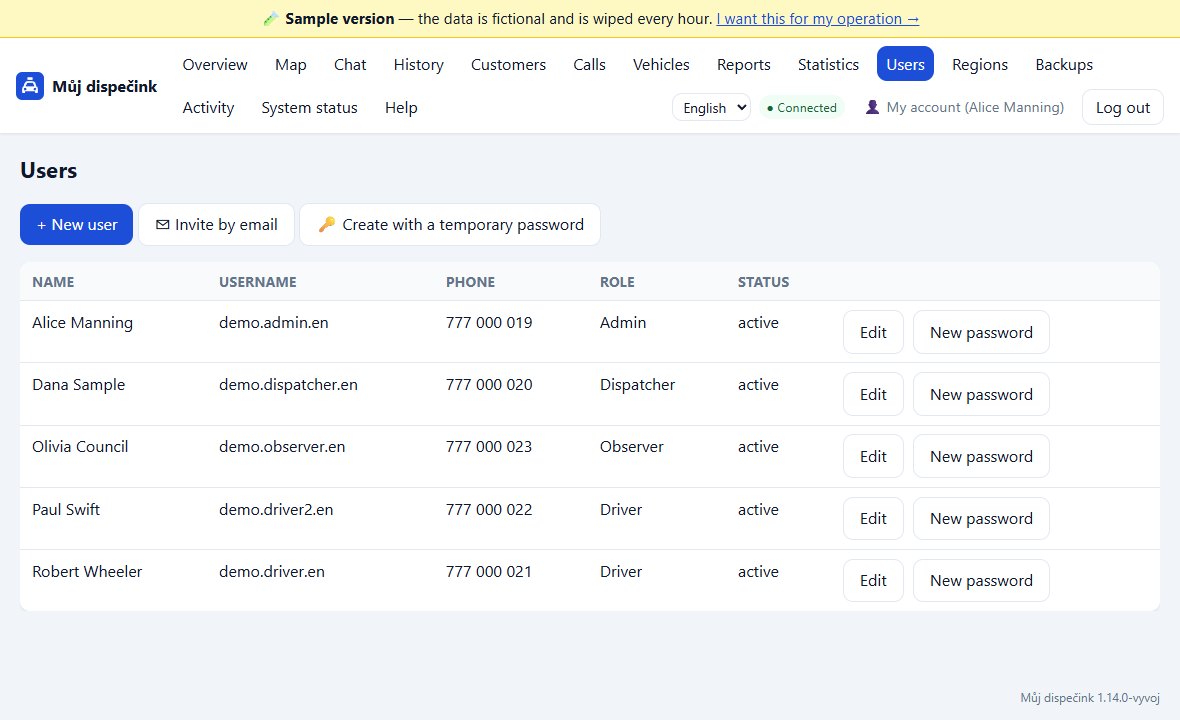
- Click Users at the top.
- Next to the person click New password and confirm.
- A temporary password appears on the screen — read it out to them over the phone (careful: it is shown only once and is valid for 24 hours).
- They sign in with it and the application immediately asks them to choose their own new password. That makes the temporary password stop working.
⚠️ If it does not work out: simply click New password again — another temporary password is generated and the old one stops working.
Managing users
💡 Where did the former driver go? Deactivated people are not removed from the list, only hidden — there is a Show deactivated too toggle under the table. They cannot be deleted outright, and that is deliberate: rides and the status history refer to them, so deleting would break reports and statistics for months already closed.
A new user, editing, disabling an account: the Users menu → + New user or Edit next to the person. For each account you choose a role (dispatcher, driver, observer) — the role determines what the user sees and may do in the application.
For the observer role there are two extra tickboxes with which you limit customers' sensitive data:
- Hide contact details — they will not see phone numbers or notes.
- Hide pass number — they will not see pass numbers.
They work independently of each other: you can switch on just one, both, or neither. Both are off by default, so a new observer sees everything. In the list of users, an active restriction is shown in brackets next to the role.
Monthly reports
The ride report is downloaded only by you as the administrator (neither the dispatcher nor the observer has access to it — reports may contain customers' personal data).
- Click Reports at the top.
- Choose the month and region (and a single driver if you wish).
- Tick what the report should contain. The options are in two groups:
- Ride columns (table columns): date, time, full name, phone, pass number, from, to, driver, vehicle, status (completed/cancelled), kilometres, price. At least one must be ticked.
- Region details (printed in the header, applying to the whole region): minimum billed km, pickup fee, rate per km, minimum price.
Your selection is remembered for next time.
- Click ⬇ Download PDF (for printing and archiving), or **⬇ Download Excel (XLSX)** when you want to work with the data further — sorting, filtering, adding your own totals.
👀 What you will see: a table of the month's rides is downloaded. It contains completed and cancelled rides — cancelled ones are marked as cancelled and greyed out, and do not count towards the totals. At the bottom there is a summary: the total number of rides (completed and cancelled), the total number of kilometres and the total price. Prices with an asterisk (*) are only an estimate — the distance of the ride is not known. ⚠️ When you include the phone number or pass number in the report, it contains personal data — store and share it in line with your privacy policy.
Operations statistics
Statistics show how the operation is running — how much you drive, what it earns, when you are busiest and where things go wrong. They are visible only to you as the administrator (dispatchers and drivers do not even see the menu item; the page shows revenue and a named ranking of customers).
Click Statistics in the top menu.
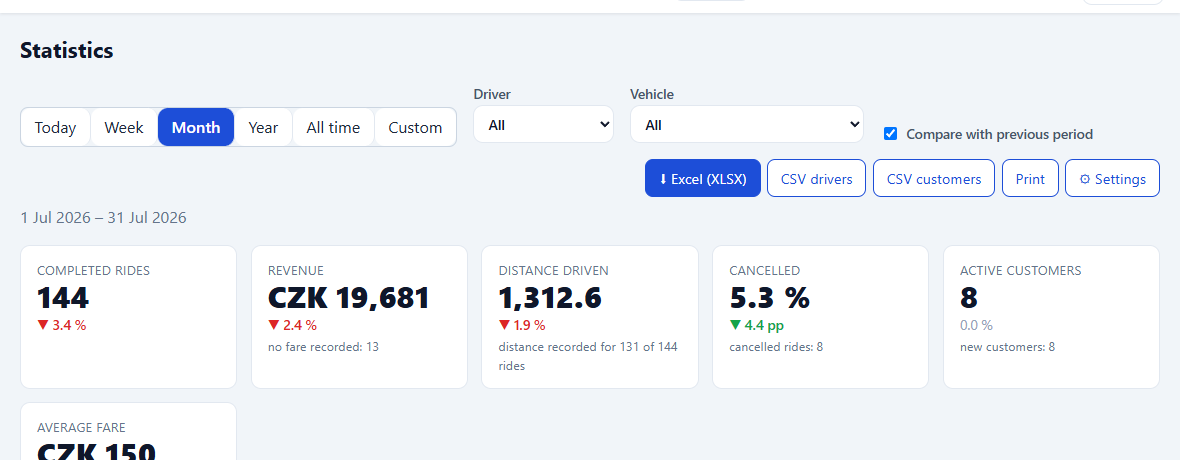
Period and filters
At the top you choose the period: Today, Week, Month, Year, All time or Custom (you set a date range). Next to it you can narrow the view down to one region, one driver or one vehicle.
With Compare with previous period ticked, each number gets an arrow showing the change. A month is compared with the whole previous month and a year with the previous year — not with "thirty days ago".
👀 What you will see: Completed rides, revenue, distance driven, the share of cancelled rides, the number of active customers and the average fare. Below them, operational figures: how long it usually takes to assign a ride to a driver, how long from there to the pick-up, how long the ride itself takes and how many rides were handed over to another driver. These are medians — the middle value, which one forgotten record cannot skew.
What the notes under the numbers mean
So that no figure looks more precise than it is, the page says what it was calculated from:
- "no fare recorded: 13" — nobody entered a fare for thirteen completed rides, so they are not counted towards revenue.
- "distance recorded for 131 of 144 rides" — for the rest, the driver did not enter the distance.
- "median of 149 rides" — how many rides had enough records for the time to be calculated.
💡 Tip: If you would rather leave rides without a fare out altogether, turn off Include rides with no fare recorded in Settings.
Charts
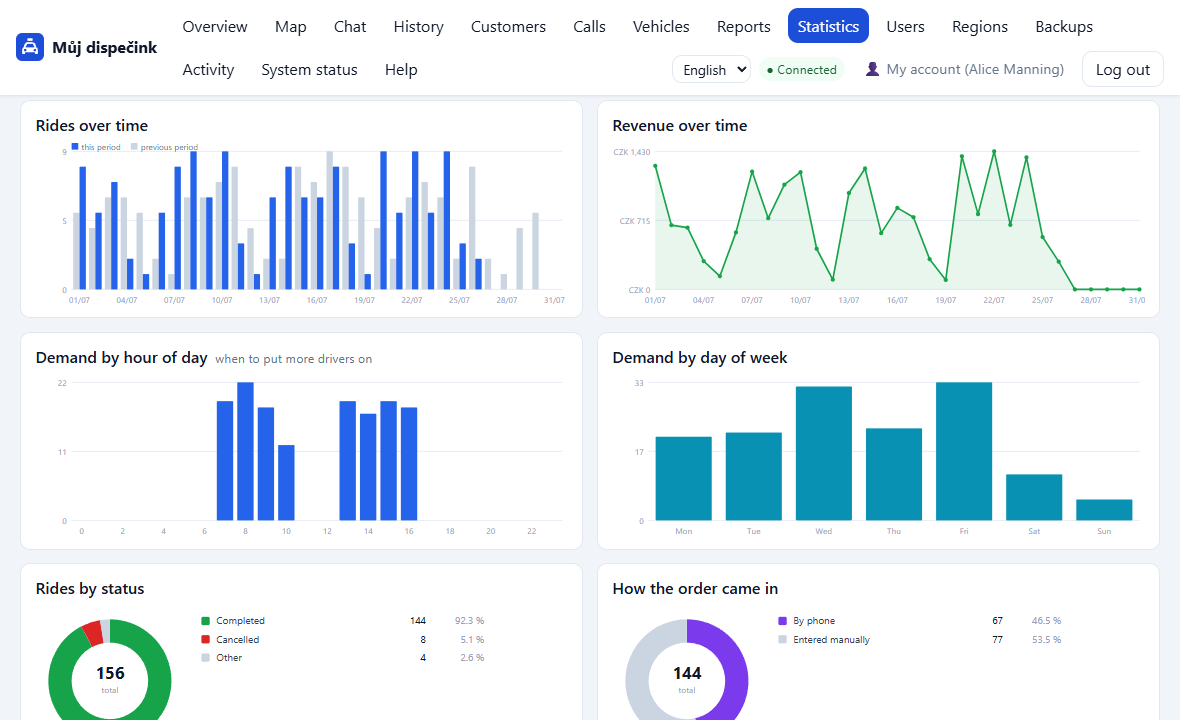
- Rides over time — bars per day (per month in the yearly view). The pale bars beside them are the previous period.
- Revenue over time — the same time axis, so the two read together.
- Demand by hour of day and by day of week — the ones people use most: they show when to put more drivers on.
- Rides by status — how many of the ordered rides were completed and how many were cancelled.
- How the order came in — by phone (from a call) versus entered manually. Only the last 90 days count, because older call records are deleted; the chart says so.
- Share by driver (and by region, if you have more than one) — a ranking by number of rides.
Tables
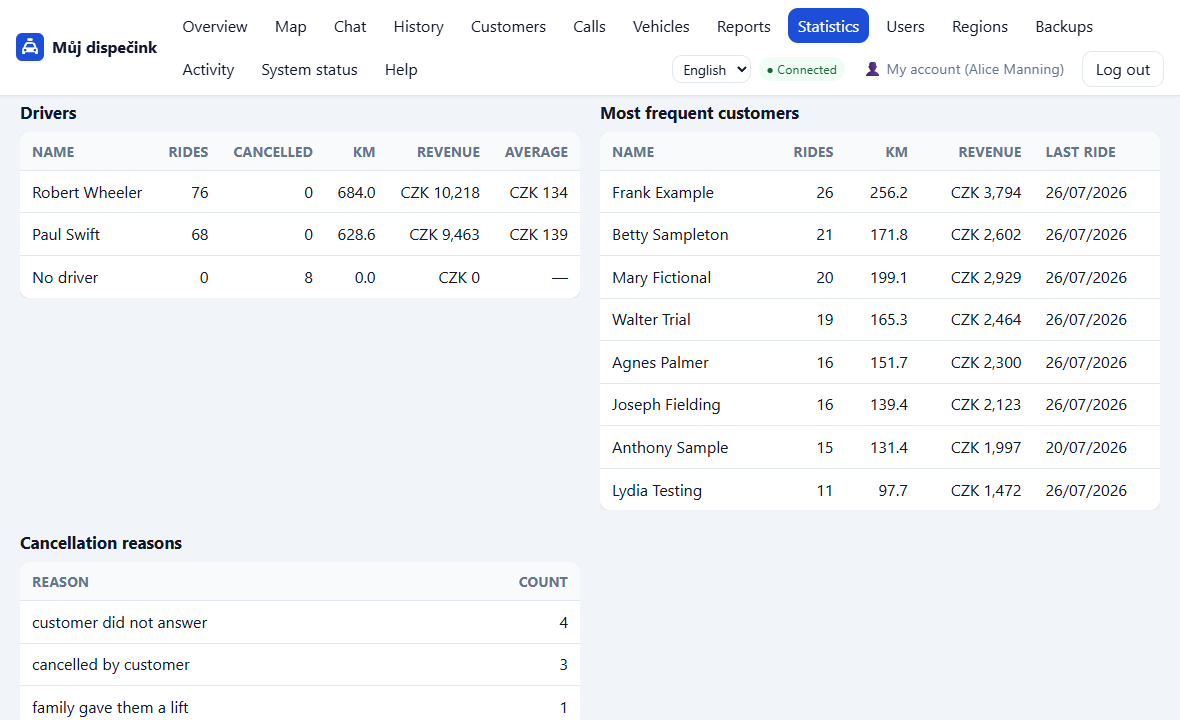
Drivers, most frequent customers, regions and cancellation reasons. For drivers you also get the average per ride, for customers the date of their last ride.
The No driver row is rides that never reached a driver — usually cancelled ones.
Excel, CSV and printing
- ⬇ Excel (XLSX) downloads the whole workbook: a Summary sheet (headline numbers, operational figures and a record of what was selected) plus a sheet for each table. Numbers are stored as numbers, so you can sum them straight away.
- CSV drivers / CSV customers download a single table.
- Print prints the page without the controls.
⚠️ The workbook contains a named list of customers and revenue figures. Downloads are therefore written to the Activity log, and the file should be handled like a report.
Settings (what you want to see)
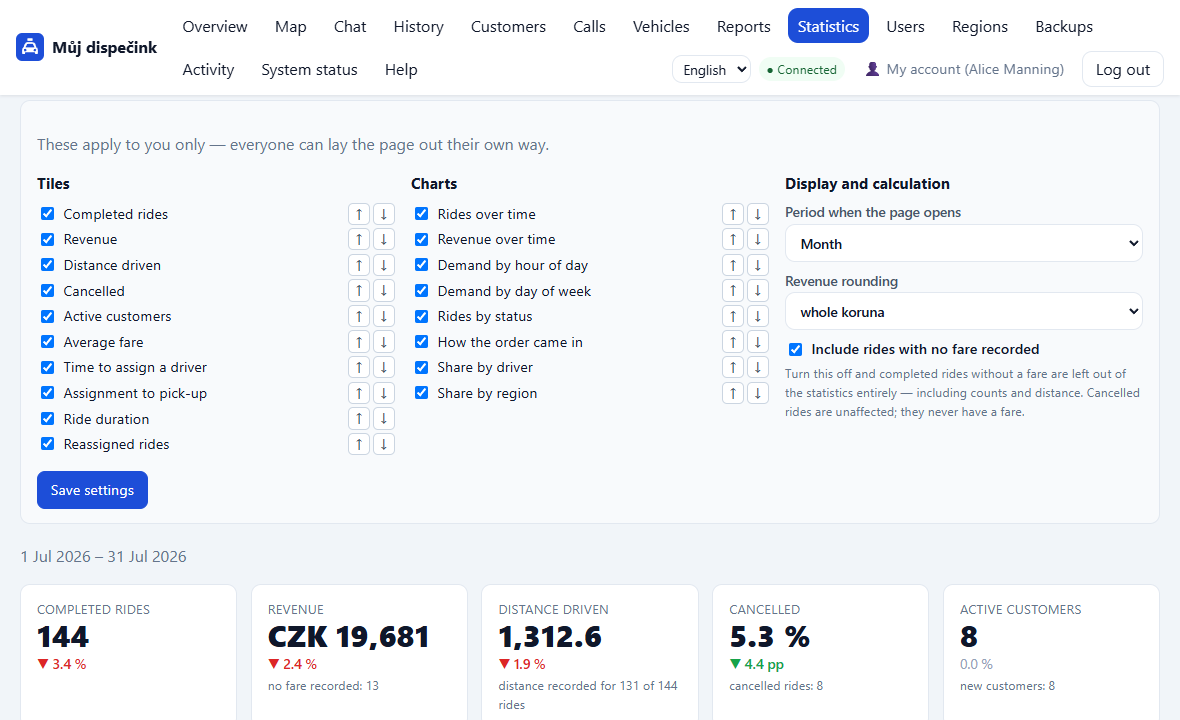
Under ⚙ Settings you choose which tiles and charts you want to see and in what order (with the ↑↓ arrows), which period should open when you arrive at the page, and whether revenue is rounded to whole koruna or to one decimal place.
Settings apply to you only. If the owner also looks at the statistics under their own login, they can have them laid out differently.
Does it match the reports?
Yes — deliberately. Statistics are calculated from the same data in the same way as Reports: the period is taken from the ride date, revenue and distance come only from completed rides, and the fare is the one stored with the ride. A report is a record line by line; statistics are trends and ratios.
Phone connection (the caller box)
With the connection switched on, every incoming call shows dispatchers a box with the caller's name, their addresses and recent rides — and a ride can be created from it in a single click.
You switch it on yourself under Telephony in the menu (only you as the administrator can see it). The guide has four steps:
- Generate a password for your phone system. It is shown only once — copy it straight away. The database keeps nothing but a hash of it, so not even we can show it again. If you lose it, generate a new one.
- Enter the details into your phone system. The app shows you two addresses and the header with the password; hand them to whoever looks after your phones.
- Switch incoming calls on. While it is off, calls are rejected — so you can prepare the configuration in peace and go live when ready.
- Check that it works. The Make a test call button shows the box exactly as a real call would. You will know your own phone system is reaching us from the last received call at the bottom of the page.
⚠️ What you need: a phone system or VoIP provider that can call a web address (a webhook) when a call comes in — typically Asterisk, FreePBX or 3CX. An ordinary mobile phone cannot do this; it has no way of telling anyone that it is ringing.
A detailed guide with configuration examples for Asterisk, FreePBX and 3CX is on the website: viacurso.com/help/taking-calls. It is public, so you can send it to a technician who has no access to the app.
When something does not add up:
- The test call works but a real one does not → the problem is on the phone system's side. Most often a typo in the address, a missing password header, or a firewall that will not let HTTPS out.
- You are changing phone systems, or the password has leaked → generate a new password. The old one stops working immediately; the address stays the same.
💡 If the connection is not running, nothing breaks — the whole app carries on as usual, only the caller boxes do not appear.
Who did what (activity overview)
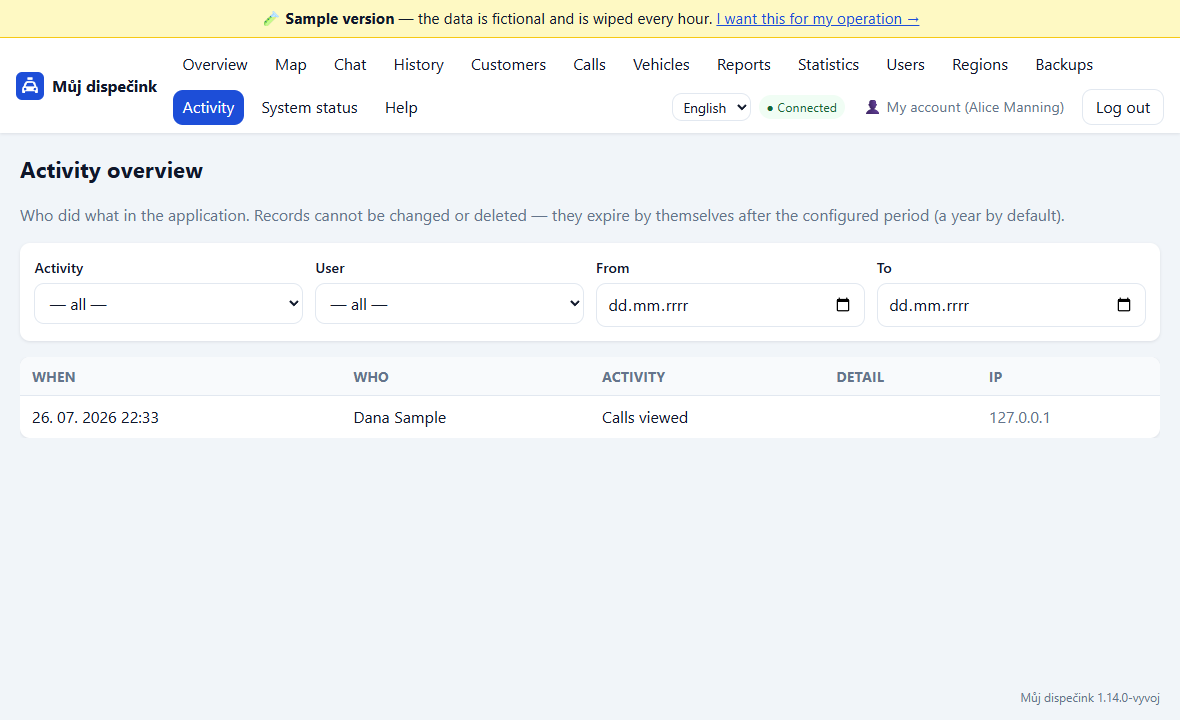
- Click Activity at the top.
- You can see who signed in and when, who changed customers, prices or passwords.
- At the top you can pick a particular activity, user or period.
💡 Good to know: records cannot be deleted — they disappear by themselves after a year. Passwords are never written into the overview.
Data backups
The application makes a copy of all data (rides, customers…) every day by itself, so that nothing is lost if something breaks.
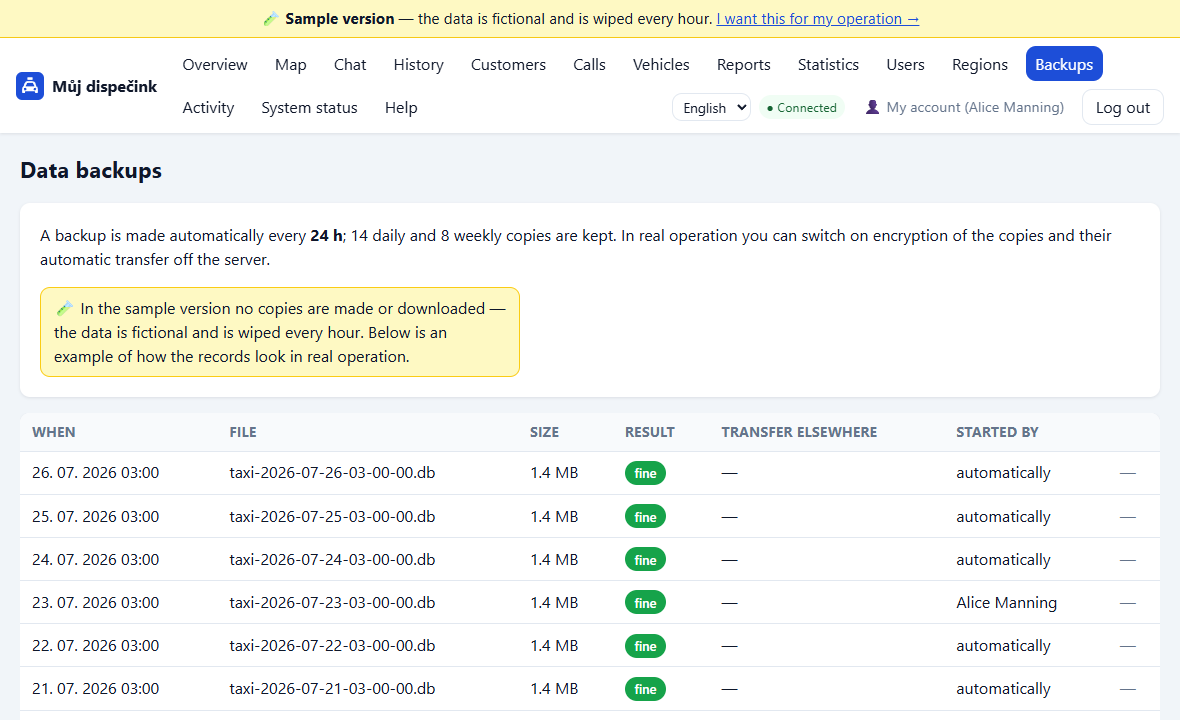
How to make a copy right now:
- Click Backups at the top.
- Click 💾 Create a copy now.
- In a moment a green message appears and the copy is added to the list. With the Download button you can save it to a flash drive, for example.
📌 What to watch: the list should show "fine" next to the copies and the last copy should not be older than a day. When you see a yellow warning that the copies stay on the server only, ask your server administrator to set up transfer elsewhere (the operations guide).